Mobile App
2.3) Associate a DynaLogger with a spot
Updated at 3/3/2023
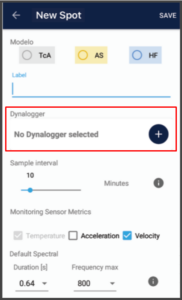
On the screen for registering a new spot, after choosing the model of the DynaLogger and assigning an identification of the monitoring point, the DynaLogger should be associated to the spot in question. To do this, press the + icon located next to the message “No DynaLogger selected”.
A screen will appear showing DynaLoggers within the Bluetooth range of the device.
Once the desired DynaLogger has been selected, the following parameters must be set in order to complete the spot settings.
• Sample interval: the value that defines the frequency of data collection, i.e. time delay between measurements.
• Sensors for monitoring: defines which parameters will be collected by the associated DynaLogger.
• Default Spectral: defines the duration and maximum frequency characteristics of the standard spectral analysis. This information is important for spots that will be collected by the Dynamox Gateway (automatic collection).
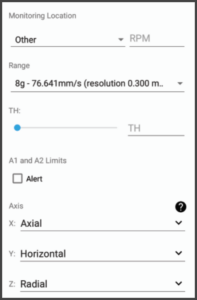
• Monitoring Location and RPM: type of component to which the DynaLogger is attached and the revolutions per minute of the rotating component;
• Range: Range of acceleration/velocity, that is, the maximum values that the DynaLogger will be able to collect. This choice impacts the graphics resolution.
• TH: defines the trigger point for asynchronous measurements in [g], i.e. the value to which, if exceeded, the DynaLogger will “wake up” and collect global vibration and temperature data. The value must be between 0 and the maximum range value.
*Available for DynaLogger AS only.
• Alerts: thresholds for which an LED alert will be triggered in case of transgression. There are two levels: A1 and A2, with A2 being the most critical. The Dynalogger LED flashes green every 5 seconds. If A1 is transgressed, the color becomes red. In case the same happens to A2, the alert remains red, but blinks twice in a row. These limits can be configured for temperature, velocity and, for devices that are supported, acceleration.
• Axes: Positioning configuration of the installed DynaLogger. By clicking on the question mark, an image will be displayed showing the DynaLogger X, Y and Z axes orientation. This orientation is also displayed on the device label. Based on this, the user can select the actual positioning given to the DynaLogger on the machine for each of the three axes. If you have any doubts about this subject, please refer to the section for Positioning of the sensor.
Once the spot settings have been completed, the changes can be saved by clicking “SAVE” located in the top right-hand corner. A summary of the settings will then be shown for confirmation.
Back to articles